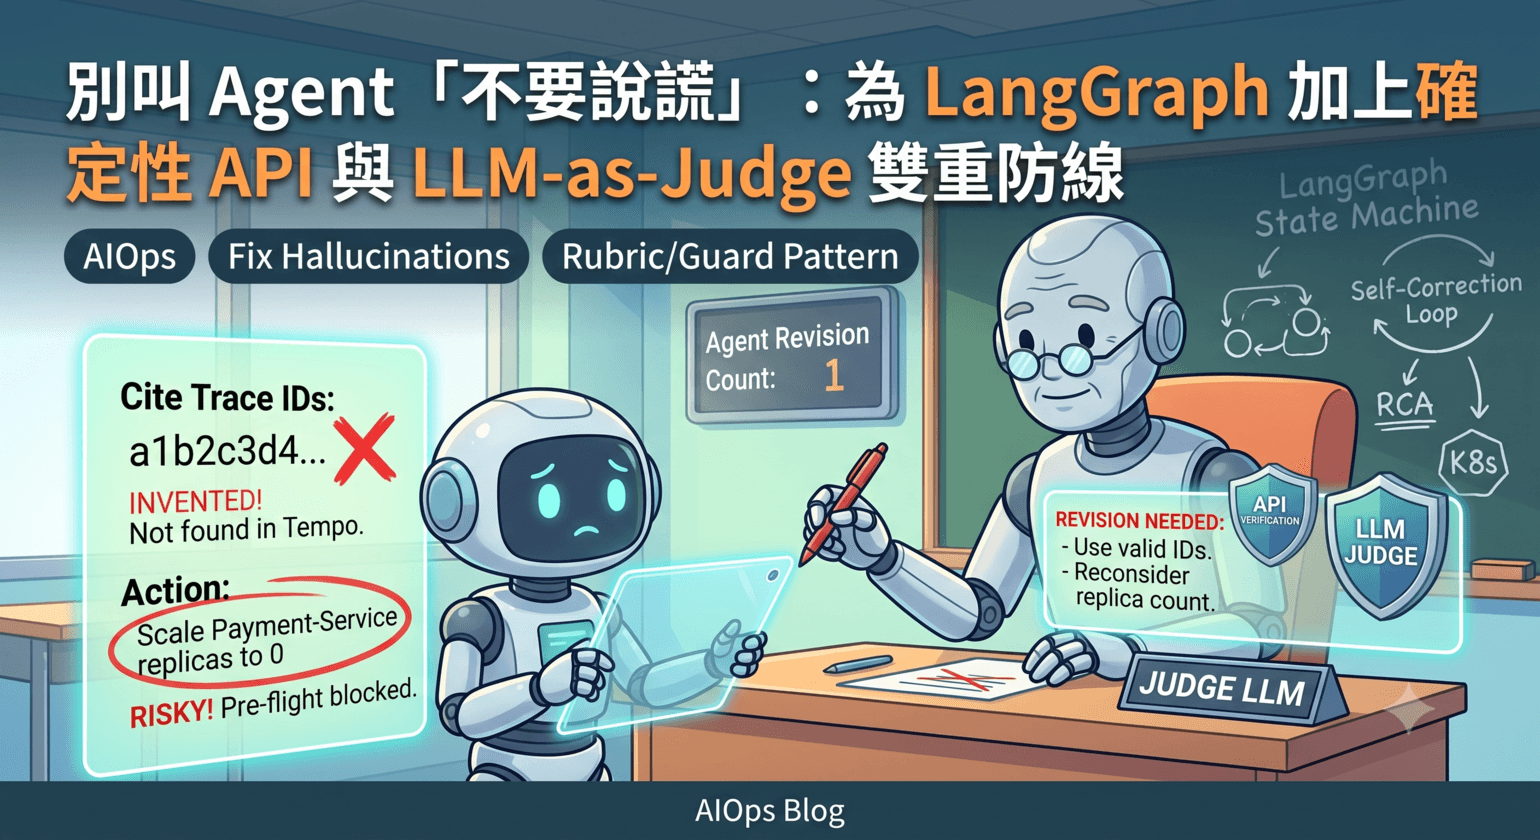
認識 MCP Go 工具
第一次知道 Mark3labs 開發的 MCP Go 工具是因為 MCP Grafana 是基於該工具開發出來的。看了一下後,真的很容易就能開發出自己的 MCP Server。同時他也支援 STDIO 與 SSE 兩種 transport 模式。

MCP 概觀
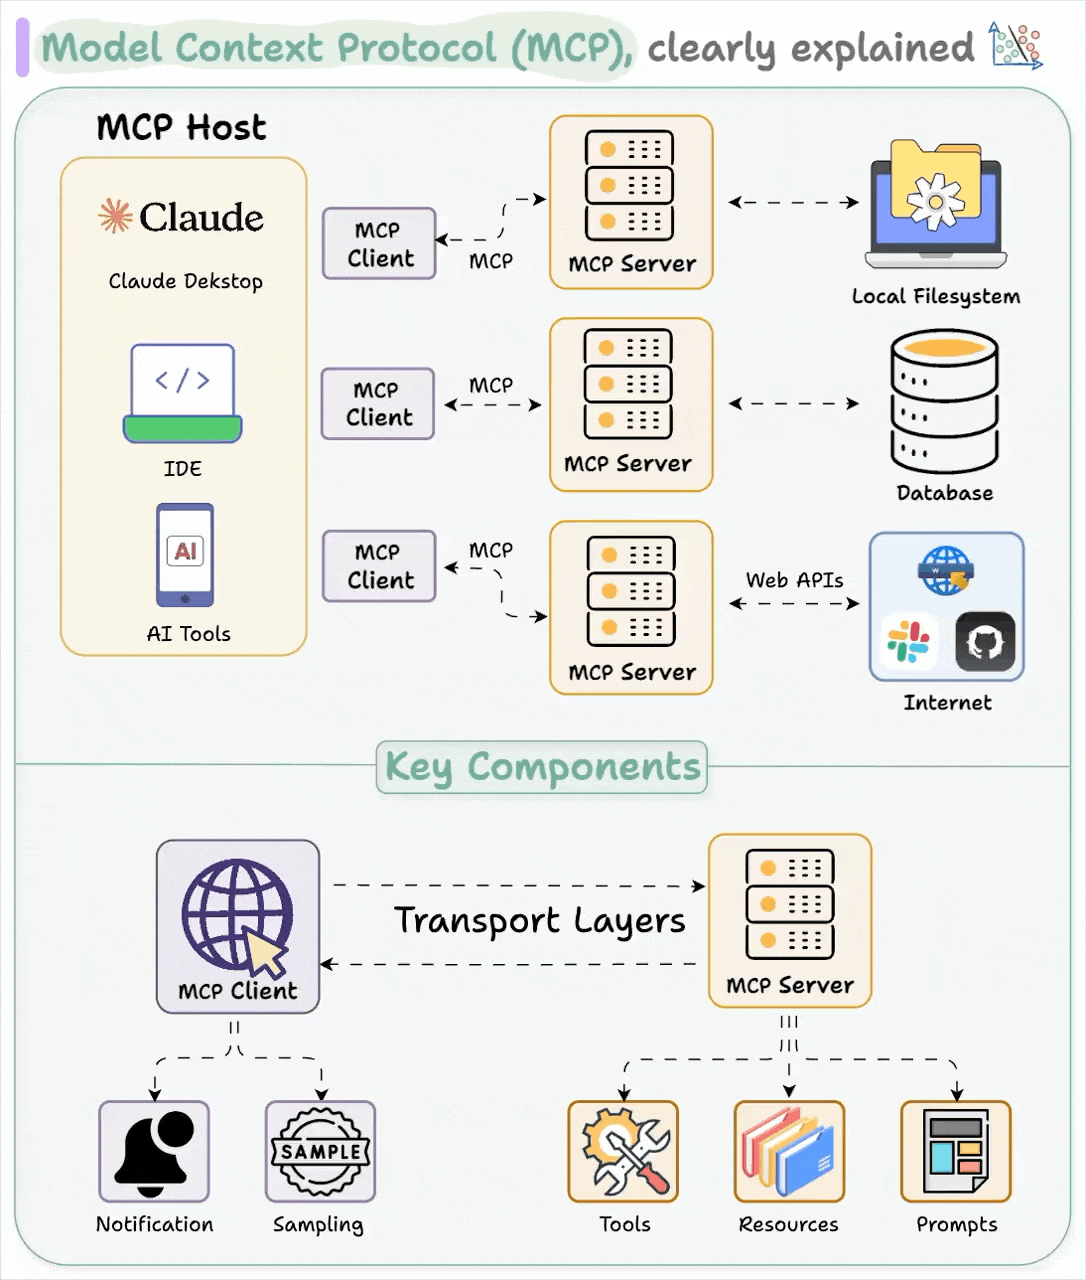
參考自 Visual Guide to Model Context Protocol (MCP)
MCP 遵從 client-server 的系統架構設計:
Host:終端用戶直接接觸的 AI 應用,如 Claude Desktop、VSCode 的 Copilot 等。Host 負責使用者介面呈現及基本的輸入處理。
Client:作為 Host 與 Server 間的通訊橋樑,類似資料庫連接物件。每個 Client 實例與特定 Server 實例保持 1:1 的耦合關係,這種設計基於:
RPC 需要嚴格的介面合約
對話型 AI 需要維持連續的上下文狀態
簡化錯誤處理與資源分配
Client 與 Server 間採用 JSON-RPC 2.0 協議交互,支援非同步操作及結構化錯誤處理。Client 實現自動重連及請求重試機制,確保系統穩定性。
Server:提供核心功能(Capabilities)的服務層,遵循介面穩定原則。Server 能夠:
在保持 API 相容性的前提下進行內部升級
適配外部服務(如資料庫、SaaS API)的版本變更
處理認證、授權
提供預先配置的 Prompt
Server 能組成叢集,透過 DNS 服務註冊與發現機制實現水平擴展
整體架構採用服務隔離設計,每個 Server 實例可專注於特定功能域,提高系統彈性及可維護性。
JSON RPC
JSON-RPC 與 gRPC 的主要區別:
JSON-RPC 沒有強制的 client stub 生成機制,採用更加動態的方式調用服務。而 MCP 是透過等等介紹到的 life cycle 來動態取得 Capabilities,但這並非 JSON-RPC 規範本身的一部分。
JSON-RPC 使用 JSON 進行編碼(動態弱型別),而 gRPC 使用 Protocol Buffers(靜態強型別)
JSON-RPC 可以透過特定實現提供的機制來動態發現服務能力,而 gRPC 通常在編譯時確定
JSON-RPC request格式的特點:
Request 一率透過 HTTP 的
POST,而調用 rpc 方法名稱(method)在 payload 中指定,而非 URL 路徑id欄位用於將 request 與 response 配對同一 Client 可發送多個不同 id 的請求。HTTP/2 有類似的概念 stream ID,用來匹配Request與Response。
無 id 的請求被視為通知 Server (Notication),Server 不需要回應
與 HTTP method 不太一樣的是, HTTP API 都會把 method 聲明在 URL 中, 而 JSON rpc 則是 POST + body 中的 payload 會註明 method。
Request:
{
  jsonrpc: "2.0";
  id: string | number;
  method: string;
  params?: {
    [key: string]: unknown;
  };
}
Response:
回覆時會把 Request 中的 id 帶到 Response 中。因為 RPC 的 client 端其實能批量送出請求,這點與 HTTP API 非常不同。
{
  jsonrpc: "2.0";
  id: string | number;
  result?: {
    [key: string]: unknown;
  }
  error?: {
    code: number;
    message: string;
    data?: unknown;
  }
}
批量請求:
回應 2 是演示如果其中一個出現處理錯誤的情況。
Requests :
[
  {"jsonrpc": "2.0", "method": "sum", "params": [1,2], "id": 1},
  {"jsonrpc": "2.0", "method": "subtract", "params": [42,23], "id": 2},
  {"jsonrpc": "2.0", "method": "foo.get", "params": {"name": "myself"}, "id": 3}
]

Responses:
[
  {"jsonrpc": "2.0", "result": 3, "id": 1},
  {"jsonrpc": "2.0", "error": {"code": -32601, "message": "Method not found"}, "id": 2},
  {"jsonrpc": "2.0", "result": {"firstName": "John", "lastName": "Doe", "age": 30}, "id": 3}
]
gRPC 批量處理,則是透過 Streaming 的形式來處理批量請求,但這裡就不多聊了。
Go 有內建 net/rpc/jsonrpc,方便能快速地建立出一個 RPC 服務來玩。
MCP Trapsort
stdio
MCP 有提供兩種 Client 與 Server 交互的方式, 最常見的就是 stdio,如果本來就知道 IPC 概念的大大就不會感到陌生了。但是他們交換的資料格式還是滿足 JSON RPC 的。
server/stdio.go
負責從 stdio 持續讀取資料
func (s *StdioServer) Listen(
    ctx context.Context,
    stdin io.Reader,
    stdout io.Writer,
) error {
    // ignore
    for {
        select {
            // ignore
            case line := <-readChan:
                if err := s.processMessage(ctx, line, stdout); err != nil {
                    // igore
                }
            }
        }
    }
}


func (s *StdioServer) processMessage(
    ctx context.Context,
    line string,
    writer io.Writer,
) error {
    // Parse the message as raw JSON
    var rawMessage json.RawMessage
    if err := json.Unmarshal([]byte(line), &rawMessage); err != nil {
        response := createErrorResponse(nil, mcp.PARSE_ERROR, "Parse error")
        return s.writeResponse(response, writer)
    }

    // Handle the message using the wrapped server
    response := s.server.HandleMessage(ctx, rawMessage)

    // Only write response if there is one (not for notifications)
    if response != nil {
        if err := s.writeResponse(response, writer); err != nil {
            return fmt.Errorf("failed to write response: %w", err)
        }
    }

    return nil
}
server/server.go
這裡就是負責解碼 body 轉成 JSON RPC 的格式。能很清楚的看見 if baseMessage.ID == nil { var notification mcp.JSONRPCNotification 這裡就是處理 notification。再來就是根據 method 來決定怎麼處理。
而 Response 也都會回傳 baseMessage.ID 回去。
// HandleMessage processes an incoming JSON-RPC message and returns an appropriate response
func (s *MCPServer) HandleMessage(
ctx context.Context,
message json.RawMessage,
) mcp.JSONRPCMessage {
// Add server to context
ctx = context.WithValue(ctx, serverKey{}, s)
var baseMessage struct {
JSONRPC string `json:"jsonrpc"`
Method string `json:"method"`
ID interface{} `json:"id,omitempty"`
}
// ignore
// Check for valid JSONRPC version
if baseMessage.JSONRPC != mcp.JSONRPC_VERSION {
return createErrorResponse(
baseMessage.ID,
mcp.INVALID_REQUEST,
"Invalid JSON-RPC version",
)
}
if baseMessage.ID == nil {
var notification mcp.JSONRPCNotification
if err := json.Unmarshal(message, ¬ification); err != nil {
return createErrorResponse(
nil,
mcp.PARSE_ERROR,
"Failed to parse notification",
)
}
s.handleNotification(ctx, notification)
return nil // Return nil for notifications
}
switch baseMessage.Method {
case "initialize":
// ignore
return s.handleInitialize(ctx, baseMessage.ID, request)
case "ping":
// ignore
return s.handlePing(ctx, baseMessage.ID, request)
case "resources/list":
// ignore
return s.handleListResources(ctx, baseMessage.ID, request)
// ignore
}
}
HTTP with SSE
SSE(Server-Sent Events)則是透過 HTTP API 的形式來調用 JSON RPC server。能看見第一步就是先建立 sse 連線。接著是透過 POST 去調用 message 端點。
MCP 連線的 LifeCycle
Client 從建立連線開始到結束會經歷 3 個階段,其中最重要的是 Initializeation 階段的準備。這階段就是提供 MCP Server 具體功能清單的階段。
Initialization: Capability negotiation and protocol version agreement
Operation: Normal protocol communication
Shutdown: Graceful termination of the connection
Init 階段會提供的能力,能直接看官網 Life Cycle 中關於 Capability Negotiation 的說明。我們演示跟做點小工具基本會用到的就是 Tools。這裡面最重要的兩個方法,一個是 tools/list,另一個是 tools/call。就是這個階段 MCP Host 就能取得 MCP Sever 所有能調用的功能(或者你想成 API 也行)。
hello world 範例
package main

import (
    "context"
    "flag"
    "fmt"
    "log"
    "os"

    "github.com/mark3labs/mcp-go/mcp"
    "github.com/mark3labs/mcp-go/server"
)

func main() {
    var transport string
    flag.StringVar(&transport, "t", "stdio", "Transport type (stdio or sse)")
    flag.StringVar(
        &transport,
        "transport",
        "stdio",
        "Transport type (stdio or sse)",
    )
    addr := flag.String("sse-address", "localhost:8081", "The host and port to start the sse server on")
    flag.Parse()
    fmt.Println(*addr)

    if err := run(transport, *addr); err != nil {
        panic(err)
    }
}

func run(transport, addr string) error {
    // Create MCP server with explicit options
    s := server.NewMCPServer(
        "Demo 🚀",
        "1.0.0",
    )

    // Add tool with more explicit configuration
    tool := mcp.NewTool("hello_world",
        mcp.WithDescription("Say hello to someone"),
        mcp.WithString("name",
            mcp.Required(),
            mcp.Description("Name of the person to greet"),
        ),
    )

    // Add tool handler
    s.AddTool(tool, helloHandler)
    // s.AddTools(server.ServerTool{Tool: tool, Handler: helloHandler})

    // Debug information
    log.Printf("Registered tool: hello_world")

    switch transport {
    case "stdio":
        srv := server.NewStdioServer(s)
        return srv.Listen(context.Background(), os.Stdin, os.Stdout)
    case "sse":
        // Create the SSE server with explicit debugging
        srv := server.NewSSEServer(s)

        log.Printf("SSE server listening on %s", addr)
        if err := srv.Start(addr); err != nil {
            return fmt.Errorf("Server error: %v", err)
        }
        // This code is unreachable as Start() blocks until error
    default:
        return fmt.Errorf(
            "Invalid transport type: %s. Must be 'stdio' or 'sse'",
            transport,
        )
    }
    return nil
}

func helloHandler(ctx context.Context, request mcp.CallToolRequest) (*mcp.CallToolResult, error) {
    name, ok := request.Params.Arguments["name"].(string)
    if !ok {
        return mcp.NewToolResultError("name must be a string"), nil
    }

    return mcp.NewToolResultText(fmt.Sprintf("Hello, %s!", name)), nil
}
重點在於以下這段 Tool,我們提供了 mcp server hello_world 這 tool。
tool := mcp.NewTool("hello_world",
        mcp.WithDescription("Say hello to someone"),
        mcp.WithString("name",
            mcp.Required(),
            mcp.Description("Name of the person to greet"),
        ),
    )
讓我們能簡單用 CURL 演示看看怎麼使用。
啟用服務,這裡我選擇啟用 sse mode,sse 能用像 http 那樣使用比較好debug。
> go run ./cmd/example1/main.go -t sse
2025/03/18 00:23:29 Registered tool: hello_world
2025/03/18 00:23:29 SSE server listening on localhost:8081
首先要建立 TCP 連線並取得 session id。
> curl http://localhost:8081/sse
event: endpoint
data: /message?sessionId=3eb00238-c763-48dc-93e0-f0276f82d71a
接著透過 message 端點來執行一些操作。
Init 階段一開始會先透過 initialize 來取得 mcp server 的基本資訊。其中的 "protocolVersion": "2024-11-05" 就是該 mcp 協議的版本號,在 MCP 官網的 specification 文件中到處能看見 Protocol Revision: 2024-11-05,就是聲明該 server 是依據此版本的規範開發的。
> curl -X POST --data '{
  "jsonrpc": "2.0",
  "id": 1,
  "method": "initialize",
  "params": {
    "protocolVersion": "2024-11-05",
    "capabilities": {
      "roots": {
        "listChanged": true
      },
      "sampling": {}
    },
    "clientInfo": {
      "name": "ExampleClient",
      "version": "1.0.0"
    }
  }
}' http://localhost:8081/message?sessionId=3eb00238-c763-48dc-93e0-f0276f82d71a

{"jsonrpc":"2.0","id":1,"result":{
  "protocolVersion":"2024-11-05",
  "capabilities":{"tools":{}},"serverInfo":{"name":"Demo 🚀","version":"1.0.0"}}}
這裡先介紹 Tools 這核心功能。
通過 tools/list 來取得所有該 mcp server 能調用的功能。這裡記得要填入剛剛取得的 sessionId。能看到 response 提供了一個 tool 名為 hello_world,以及他的說明與參數。
> curl -X POST --data '{
  "jsonrpc": "2.0",
  "id": 1,
  "method": "tools/list",
  "params":{}
}' http://localhost:8081/message?sessionId=3eb00238-c763-48dc-93e0-f0276f82d71a

{"jsonrpc":"2.0","id":1,"result":{"tools":[
  {"description":"Say hello to someone",
   "inputSchema":{"type":"object","properties":{
      "name":{"description":"Name of the person to greet","type":"string"}},
      "required":["name"]},"name":"hello_world"}]}}
然後透過 tools/call 端點來執行 hello_world。
> curl -X POST --data '{
"jsonrpc": "2.0",
"id": 1,
"method": "tools/call",
"params": {
  "name": "hello_world",
  "arguments": {
    "name": "雷N"
  }
}
}' http://localhost:8081/message?sessionId=3eb00238-c763-48dc-93e0-f0276f82d71a

{"jsonrpc":"2.0","id":1,"result":{"content":[{"type":"text","text":"Hello, 雷N!"}]}}
到此基本上一個最簡單的 MCP Server 就能用了。我們嘗試加入 MCP Host使用。
至於 MCP server 另外兩個主要功能對象 Resources 與 Prompt,下次再介紹,等摸熟點。
整合進 MCP Host
產生執行檔, 將上述的 Go 進行編譯安裝。
GOBIN="$HOME/go/bin" go install github.com/tedmax100/mcp-demo/cmd/example1
Claude Desktop
我們先演示 Cluade Desktop 中怎設定。選擇 settings → Developer → Edit Config。

然後新增一個 server 名稱 我這裡叫 example1,command 中加入剛剛編譯安裝好的 執行檔的絕對路徑。接著重啟 Cluade Desktop。
{
  "mcpServers": {
    "example1": {
      "command": "/Users/nathanlu/go/bin/example1",
      "args": [],
      "env": {}
    }
  }
}
就能在對話視窗的右邊看見一個鐵鎚的icon,點下去就能看到剛剛新增的 hello_world 來作為 tool 使用了。

就能看見是否要允許 hello_world 工具在本機執行的權限申請。


VsCode with Cline
因為也不是所有作業系統都有 Clause desktop,但 VsCode 是開發者的好朋友,因此我們能安裝 Cline 來使用MCP server 的功能。
安裝好 Cline 接著來設定 Cline 的 MCP client。選擇上面的 MCP Servers,然後選擇 Installed 頁籤,接著點擊設定config,把剛剛的 mcp server config 內容再貼上一次。就安裝完成了。

就會看到以下畫面,這裡亮綠燈就代表剛剛的 Initialization 都完成了,也取得了該 server 所有能用的 tools。

就能使用這工具了。

Cline 的 API Provider 我是換成 Google Gemini,能調用的次數多非常多,不然 Cline 玩沒五分鐘就沒額度了,能透過 Gemini studio 後台來申請 API KEY。
總結
MCP 標準的出現,感覺給開發者們打了雞血,透過這標準,能夠用各種程式語言來實現 MCP Sever 與 Client。並寫出自己的小工具真的很方便,就差 Prompt 不熟,再努力學習。過陣子再介紹 MCP Grafana 的部分。